· Progress Report #2 - Carving
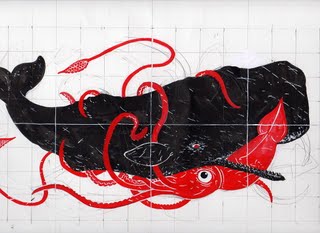
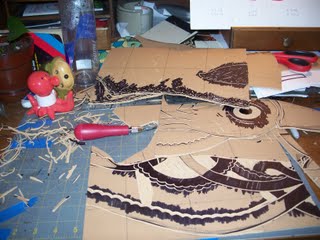
So, having designed the image, and having already carved the first part (the whale), I set about carving the red squid portion of the design. I drew the image on a grid, and each square of 7/8" got blown up to 3 1/2" on the linoleum (each section is 13" x 13", to fit in the window panes of the door which inspired the project in the first place... which presented some problems in that linoleum really only comes in pieces of 12" x 12", so that in a few of the panels seams show where I had to add an extra inch to the blocks to fit... you can see such an extra piece in the middle of the photo below. I still like the way it looks, however).
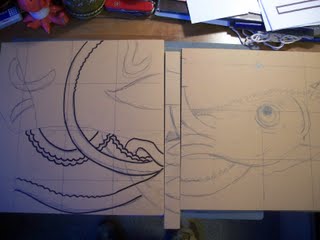
It was a fairly simple process to take the smaller image and draw it on the larger grid, I would just look at an individual square and think "Okay, so this tentacle passes just under the upper right corner, and continues on the the middle of the left side", etc. Old school! You can't get a perfectly exact reproduction of your initial image this way, but that was part of the fun for me, to let the idiosyncrasies of the carving process take the image in somewhat new directions. I was especially taken with how well the process of carving worked with the subject matter of these undersea creatures in mortal combat... the details of a Sperm Whale's hide really are a tracery of gouges and scratches in a huge field of color (I was lucky enough to see Sperm Whales in New Zealand, and they really barely look alive, they are too big to take in). When I was carving in the small details, like the wrinkles around the eyes, for instance, I would use a sharpie to make the lines pop out more and be easier to visualize. Overall, the final design was very close to my original drawing.
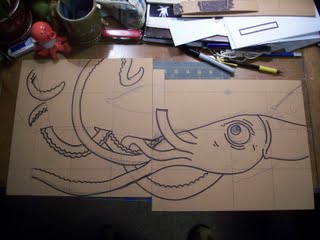
The tricky part was trying my best to make sure that the squid blocks lined up correctly with the whale blocks. Using the grid, I would line us the blocks up, one on top of the other, and use an awl to make little punch marks at the edges of where I would have to carve away the black block to show the red image (for instance, where a tentacle lay over the whales body). I tried to be very meticulous, but I won't really know how well I did until I print the black over the red and see! Yikes!
Okay, that's it for now... I'll be back next week with a post about the actual printing of the thing, with the extraordinary assistance of Aaron Cohick of New Lights Press. Until then, have a happy Thanksgiving!
It was a fairly simple process to take the smaller image and draw it on the larger grid, I would just look at an individual square and think "Okay, so this tentacle passes just under the upper right corner, and continues on the the middle of the left side", etc. Old school! You can't get a perfectly exact reproduction of your initial image this way, but that was part of the fun for me, to let the idiosyncrasies of the carving process take the image in somewhat new directions. I was especially taken with how well the process of carving worked with the subject matter of these undersea creatures in mortal combat... the details of a Sperm Whale's hide really are a tracery of gouges and scratches in a huge field of color (I was lucky enough to see Sperm Whales in New Zealand, and they really barely look alive, they are too big to take in). When I was carving in the small details, like the wrinkles around the eyes, for instance, I would use a sharpie to make the lines pop out more and be easier to visualize. Overall, the final design was very close to my original drawing.
The tricky part was trying my best to make sure that the squid blocks lined up correctly with the whale blocks. Using the grid, I would line us the blocks up, one on top of the other, and use an awl to make little punch marks at the edges of where I would have to carve away the black block to show the red image (for instance, where a tentacle lay over the whales body). I tried to be very meticulous, but I won't really know how well I did until I print the black over the red and see! Yikes!
Okay, that's it for now... I'll be back next week with a post about the actual printing of the thing, with the extraordinary assistance of Aaron Cohick of New Lights Press. Until then, have a happy Thanksgiving!


